Hammer

Sunday 17 November 2013

The best brownies

Real American Brownies with a European recipe


When I make these, I am always asked for the recipe. Here is the problem: they are made with Baker's Unsweetened Chocolate which is not available in the UK. So, with a bit of practice and a few batches, I have converted my Great Aunt Ruth's Brownie recipe to a European friendly version. For my US followers who can get Baker's Unsweetened Chocolate, I have also included the original version:

Aunt Ruth's Brownies - Original version:
2 1/2 oz Baker's Unsweetened Chocolate (2 1/2 wrapped squares)
1/3 cup salted butter
2 eggs, beaten
1 cup sugar
1/2 cup all-purpose flour
1/2 t baking powder
1/8 t salt
1/2 t pure vanilla extract
1 cup chopped nuts, optional

Preheat oven to 325 F / 170C (160 C fan)

Grease and flour a 8" x 8" or 9" x 9" baking pan, or better yet, line it with a piece of parchment paper you scrunch into a ball and then open up to line the pan. Melt chocolate and butter in a double boiler (glass bowl on top of a saucepan with a little bit of slow simmering water below). Let cool, then add the sugar, 2 beaten eggs and the vanilla. Give this a good stir with a fork, let rest for a few minutes and stir it up again. Next, add the flour, baking powder, salt and nuts if desired. Mix together and pour into the prepared pan. Bake for 25 minutes for 8"x8" pan and 20 minutes for 9"x9" pan. The brownies will rise in the pan as they bake, but you need to take them out before the set firmly. Cut into 16 sqaures once cooled. Doubles well for larger batches.

+Abigail Wyckoff notes in the family cookbook that for a richer brownie, use 1 1/2oz unsweetened chocolate and 2 oz bittersweet chocolate.

Aunt Ruth's Brownies - European Version:
70 g 70% dark chocolate
85 g salted butter
2 eggs, beaten
100 g caster sugar
50 g light brown sugar
75 g plain flour
1/2 t baking powder
1/8 t salt
1/2 t vanilla

Preheat oven to 170 C (160 C fan)

Line and grease a square pan with greased baking parchment (teflon sheets are really useful here as well). Melt chocolate and butter in a double boiler (glass bowl on top of a saucepan with a little bit of slow simmering water below). Let cool, then add the sugar, 2 beaten eggs and vanilla. Give this a good stir with a fork, let rest for a few minutes and stir it up again. Add the flour, baking powder, salt and nuts if desired. Mix together and pour into prepared pan. Bake for 25 minutes for 190 cm pan and 20 minutes for 210 cm pan. Cut into 16 squares once cooled. Doubles well for larger batches.

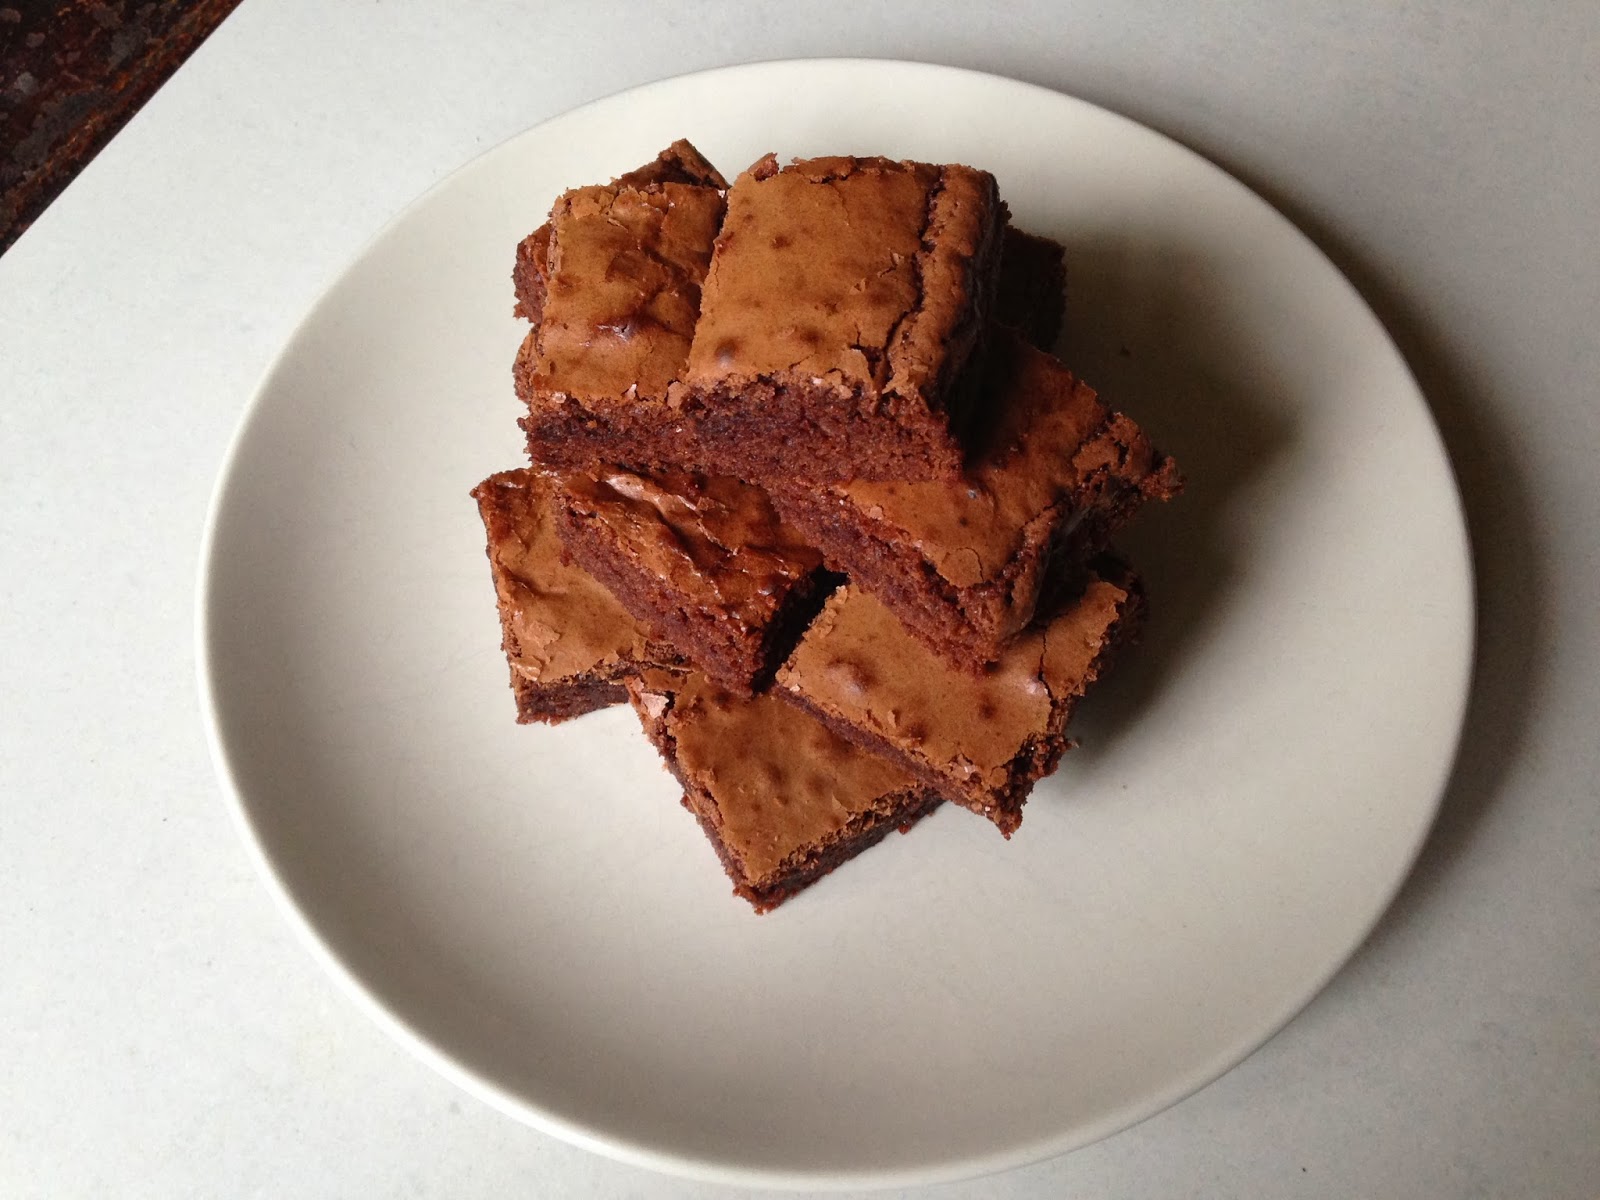
TOP TIP FROM A FOOD STYLIST ABIGAIL WYCKOFF: If you cut the brownies with a cheap plastic knife after they've cooled, you get a nice clean cut.


Saturday 27 April 2013

Vintage Camper Vans in Cornwall

I had a crazy notion a few years ago. I received a special offer (3 night for the price of 2) from O'Conner Camper to try out their vintage Volkswagen Camper over the Easter holidays. The children were small and I was dreading being housebound with them for the entire school holiday. With that motivation, we booked a 3 night get-away in one of the cutest VW Campers I've ever seen. We had a great time exploring Devon and Cornwall. I learned two things on that trip: April is a little early in the season to camp, but vintage camper vans make a great family holiday. 


Happy boys in the camper van


And for those of you have read my blog entry about my self-catering check list, this was one of the few times that I didn't need it. They really thought of everything! (This cute yellow Camper Van is called "I am Sparticus"!)

Tell them Michele from Life At My Bench sent you. For more information about prices and availability, click on the link below.

O'Conner Campers

Tuesday 5 March 2013

Roulottes at Chateau Monfreville


My post about Chateau Monfreville is my most popular to date. I've asked Zoe McKinley to do a guest post on the story of those amazing roulottes she renovated. They are so much fun to stay in!


Zoe writes: I bought two Irish gypsy vans on a complete whim: spied them for a minute or two and thought they’re great! The next thing we know, we’ve hired a lowloader trailer. One at a time they were slowly dragged onto the trailer and driven down the motorway. It was quite surreal to see travellers with their horses and wagons parked up on the verges waving to us as we passed. Little did they know that glamping was our intention.

Well, they sat next to my veggie patch for a few months whilst the weather did its worst.


I contemplated the not so very intact roulottes which were in a far worse condition on closer inspection. Contemplation took me off to Paris to forage the markets for fabrics, papers, stickers and inspiration. 


Not often does one get the chance to have a blank canvas and do whatever pleases you. Things you would never dream of doing in your own home. 


Spring brings sunshine and a determination to get the project under way. I’ve taken bookings which is so exciting. Where to start?! 


Stripping, filling, painting, wallpapering, scrubbing, stitching and on and on it went. Four months later the result was Miss Molly & Madam ZoZo.


My roulottes are a delight to me. They make me smile every time I see them. Lovely people holiday in them every summer, bringing happiness to all who live in them. The roulottes bring a little romance all of their own. Bizarrely, the majority of people who stay are average height woman, married to the tallest men I think I’ve ever met!!! Happy Days.

For more information about glamping at Chateau Monfreville, visit their website at www.chateaumonfreville.com

Monday 4 March 2013

A proper pot of Orange Marmalade


It's March and the days are still quite cold, but there is hope in the air for a bit of Spring to come. There is another little glimmer of light in this month: the Seville Oranges are still season. To the British this means one thing - make marmalade in vast quantities - enough to last until next Christmas!


A few years ago my dear friend, Liz Horton, handed me a pot of her homemade marmalade as a Christmas present. I secreted it away from the rest of the family because I had never tasted marmalade that delicious in all my life. Stupidly, it never occurred to me that I could make it. I would occasionally purchase some at church fetes or school fairs, but make it? Much too difficult. That was until lovely Liz invited me to her house one dark, snowy afternoon to a tutorial in how to make a proper pot of British Orange Marmalade. The first time I made it I was still slightly sceptical that I could make it on my own, but by the second year I was beginning to understand the nuances of the experience. This year we couldn't make our busy schedules align, so she encouraged me to have faith and try it on my own.

Therefore, this blog post is really dedicated to Liz's fine teaching skills. I have taken her beautifully crafted recipe and added my own pictures of the process to illustrate how easy it is to make. This recipe made 14 various size jars of the golden nectar, the majority being the standard Bonne Maman size jars, which I save all year long for just such an occasion. Let's hope my first batch of marmalade lasts until Christmas!

Seville Orange Marmalade
(makes approx 10 lbs of marmalade)

Ingredients:
3 lbs (1.5 kg) Seville oranges
2 lemons
6 lbs (3 kg) Granulated cane sugar eg Tate & Lyle (not beet sugar)
5 UK pints (that is 5 x 20 fl oz) of water

Method:
Wash fruit and remove stalks. Knife a cross (just over an inch) at both ends of fruit. 


Place in a very large preserving pan with the 5 (UK - see above) pints of water. Cover, bring to boil then reduce to a slow simmer for 2 hours. 

Remove the oranges to a large colander sitting over a bowl to allow to cool and collect any juices that run free from the fruit. Pour any of this delicious juice back into your preserving pan. Meanwhile, wash your collection of jars and place them on oven-proof trays ready for heating (or just pop them all in dishwasher). Weigh out the sugar and place in large flat pans. Put the pans of sugar into the oven onto low-medium heat (130 degrees C or 250 degrees F) for at least half an hour. 


Once the fruit is cool enough to handle, cut in half and scoop out innards and pith into sieve over  another clean bowl.


Push through innards until most gone through sieve and the remaining mixture seems a bit dry. Put all the sieved innards in bowl back into the preserving pan.


Cut up skins into desired size of shred and put in preserving pan. 


Bring everything back up to boil and boil rapidly for about 5 minutes. Remove the sugar from oven and add to preserving pan all at once. Stir constantly until sugar completely dissolves.

Bring everything back up to boil and let it do a rolling (ie: high) boil for at least 20 minutes. 

Put some side plates into freezer to prepare for the set test. Meanwhile, if you haven't washed the jars in the dishwasher, turn up oven and put the jars in to sterilise them. 

Test for set: place a teaspoon's worth of mixture onto very cold plate and wiggle to see if skin forms and crinkles. Once happy with set, turn off the heat and allow to cool for 20 mins. Make sure jars are warm but not too hot. Pour the marmalade into jars using jug or a large preserving funnel. Fill the jars to the brim. Cover the interior of the jam jar with a wax disc. Allow to cool completely in jars and then put on cellaphane cover, lids and labels on.


If you would like to enjoy this marmalade on some beautiful homemade No-Knead Bread, you can find it at: No Knead Bread recipe

Wednesday 13 February 2013

Winter minestrone soup with borlotti beans and bacon


Being February, it is still quite cold outside. I find I really must have a hot lunch to keep my spirits up. Often, I will make a large pot of this healthy soup and parcel it out by the bowlful over the course of the week. But best of all, it is wonderful if I can convince my children that this is their after school snack - warming and full of Organic vegetables. This recipe can easily be adapted to a vegetarian soup by removing the bacon, but if you aren't a vegetarian, it does give a depth of flavour that satisfies the soul.

A few words about borlotti beans: these protein packed beans have a creamy texture when cooked and add a nutty flavour to your dish. If you are unable to find tinned borlotti beans, cannellini beans can be substituted. The American equivalent to borlotti beans are cranberry beans. 

1 T olive oil
1/2 cup bacon, diced or lardon
1 onion, diced
2 carrots, sliced
2 celery stalks
1 leek, sliced
1 tin borlotti beans, drained
2 garlic cloves, crushed
Chicken stock *
1/2 red pepper, diced
small bit of crushed chili or hot red pepper (optional)
thick egg noodles or pasta
4 leaves from a savoy cabbage, thinly sliced
grated Parmesan cheese

Saute the bacon in olive oil until the fat is rendered from the meat. Add the onion, carrots, celery, leek and sweet the vegetables until tender. Add the garlic and drained borlotti beans to the pot. Top up the pot with homemade chicken stock or water with a vegetable stock bouillon powder, such as Marigold. Once the carrots have softened, add the red pepper and egg noodles. When those are just about al dente, add the Savoy cabbage. Serve in a big bowl with a grating of Parmesan cheese on top. 

I also like to leave out the noodles and pour the soup over high quality stale French or Italian bread for Ribollita. Another lovely option is a nice green dollop of fresh pesto on the top of the soup.

* I always have some stock in the freezer made with my leftover roast chicken. Here is my recipe for chicken broth: http://www.lifeatmybench.blogspot.co.uk/2013/01/chicken-noodle-soup.html


Tuesday 5 February 2013

15 minute Games


Remember when we used to go on holiday and there was no TV, no handheld electronics and no Internet? It is very hard to replicate it. We've had a family property in New Hampshire until this year where we have tried to give this experience to our children. My sister and I have banned all modern forms of entertainment for our children, until cocktail hour when we'd put a DVD on the laptop for them (no need to be monastic!).

But, we have had a great time playing an assortment of 15 minute games around the dining room table on rainy mornings or late at night. Here are a few family favourites that you may or may not know about. Click on the name of the game to go to the Amazon.co.uk site or go to the Amazon list below for the US version:


Bananagrams: Really fun and completely addictive game. Great for all ages.

Blokus: Really fun and quick strategy game. Great for spacial perception.

Quoridor: My children beat me at this regularly. Think empowerment!

Tantrix: A bit more complex, but keeps them busy a bit longer!

Uno: I loved playing this with the children when they were very young. Still fun!

Rory's Story Cubes: You don't need these to play the story game, but it sure is fun to roll the dice!
Hoyles Card Game Rules: This book and a deck of cards will keep you busy for weeks.

For more information on these games, look at my list on Amazon.com: 15 Minute Games

And if all else fails, get them to the table with the After Eights game.

Friday 1 February 2013

Wild Rice Salad


This is a bit of an impromptu posting: I just threw together this salad for lunch and it tasted so good I had to share it with you. This is what I call and open-palm recipe; in other words there aren't really any measurements, just a bit of what you have in your refrigerator. Take the recipe as a starting point and be creative.

Wild Rice Salad:

cooked wild rice
chopped yellow pepper
dried cranberries
chopped red onion
diced beetroot
chopped flat leaf parsley
crumbled pecans (6 - 8)
drizzle of olive oil
drizzle of aged balsamic olive oil
drizzle of red wine vinegar

What would you add to this?

Wednesday 30 January 2013

No Knead Bread


In 2006, Mark Bittman wrote an article in the New York Times about Jim Lahey of Sullivan Street Bakery's No Knead Bread recipe. This article sparked a bread making revolution in America. My mother's eagle eye spotted the article and cut it out for me. She sent it off to me in London saying, "You must try this recipe, it is magic!" Try it I did, and yes, it is magic. So, now I say to you, dear reader: "You must try this recipe, it is magic!" Imagine, anyone of any level of bread making experience can make the most beautiful loaf of bread in your home kitchen! And you don't need to be nervous about your kneading skills.

We have photographed the whole process for you to help illustrate how easy this recipe is. The most important thing is to realise it will take 18 - 24 hours to ferment, so plan to make your loaf a day in advance.

Mark Bittman reveals the No Knead Bread

Jim Lahey's No Knead Bread

I like to make my bread with some wholemeal flour to give it a bit more fiber. My recipe has slightly different weights and measurements to Jim Lahey's original recipe. In the UK, bread is best made with strong flour which has a higher gluten content. In America, I favour King Arthur Flour, which is a great all-purpose flour. You could also combine the flour measurements and use their White Whole Wheat product.

180 g / 1 Cup (strong) whole-wheat or wholemeal flour
310 g / 2 Cups (strong) white flour or All-Purpose flour like King Arthur's
1/2 tsp yeast
1 3/4 tsp table salt
345 ml / 12 oz water


Place all of the dry ingredients in a large bowl.

Whisk them together so they are thoroughly mixed.

 Add the room temperature tap water to the dry ingredients.

The dough will come together into a rough and slightly sticky batter with a quick stir. Cover with cling film and allow to ferment for 12 - 18 hours (even up to 24 hours).

 The dough will become quite loose and wet after 18 hours.

Turn your oven onto 225C/450F and place a covered casserole dish into the oven to heat for 30 minutes. (Others have used covered Pyrex dishes, ceramic dishes with lids or Aluminium casseroles. The most important element is that it has a cover.)

Turn your dough out onto a liberally floured tea towel.

 Very gently shape the dough into a round loaf and allow to rest while the pot heats in the oven. Do not knead it! You've made a lovely structure and kneading will ruin it.

Gently place the dough into the VERY HOT lidded casserole dish. Some people put a bit of cornmeal or bran on the bottom of the pot to prevent sticking, but I haven't found this is necessary. Put the lid on and place it back in the oven.

 Bake for 30 minutes at 225C/450F with the lid on. After 30 minutes, it will look like this.

 Remove the lid and bake for a further 15 minutes at the same temperature. It will look like this.


Allow the loaf to cool for an hour before cutting into it. This will be the biggest challenge of the entire recipe. 

Once you've made this recipe you can start to make lots of variations. Try onion, cheese and rosemary or cranberry and pecan. Simply add those ingredients at the beginning of the process. What variations would you make?


Sunday 27 January 2013

Roast Buffalo Cauliflower Salad

My friend Stephanie says I can't follow a recipe, EVER. There is some truth in that. Despite having over 100 (150?) cookbooks, I rarely open them to follow a recipe. This may be a perfect example of how I'll take an idea and run with it. 

For those of you who are unfamiliar with Buffalo Chicken Wings, they were first served at The Anchor Bar in Buffalo, NY in 1964. The wings were fried, tossed in a buttery hot pepper sauce and served with a blue cheese dressing and celery sticks. Buffalo wings are now a favourite bar snack and a popular dish to serve when watching America Football. This makes a great vegetarian alternative to Buffalo Chicken Wings.


Roasted Buffalo Cauliflower Salad
1 head cauliflower
2 T olive oil
1 - 2 T hot sauce
salt

Handful of each of the following:
rocket/arugula
crumbled blue cheese (Maytag in the USA or Roquefort in Europe)
2 stalks of celery, sliced diagonally
toast pecans
olive oil
red wine vinegar

Pour the olive oil and hot sauce into the bottom of a large bowl. Separate the cauliflower into small florets and drop into the bowl. Toss it around to distribute the olive oil and hot sauce. Drop it onto a shallow roasting tray and sprinkle with salt. Roast for 20 minutes at 200C/400F until the edges get toasty brown. This may take a bit shorter or longer depending on how hot your oven runs. Take it out of the oven and let it cool.

Build you salad in a wide bowl or platter with a layer of rocket/arugula on the bottom, followed by the roast cauliflower. Tuck slices of celery around the platter and crumble some blue cheese on top. Drop a few pecans over the salad. To dress it, I recommend drizzling some nice olive oil across the top and give it a splash of red wine vinegar. Don't toss it, just serve it as you have constructed it. 

Let me know what you think of my new vegetarian twist on a Buffalo classic.


Monday 21 January 2013

Chicken Noodle Soup Recipe


In the height of this flu and cold season, nothing makes me feel better than a bowl of homemade chicken noodle soup. In fact, I can crave it acutely. And when London turns snowy and wintery, I positively must have it. If you are like me, may I suggest you put some of the extra stock in the freezer for one of those days you are feeling low and just need that quick fix of "feel better soup".

This recipe is based on the one my Grandmother taught me when I was a child. You can read about it in my post entitled, "Grammy Wyckoff's Chicken Noodle Soup". If you don't have the time to make homemade egg noodles, find some nice sturdy noodles with a bit of bite. Even the pickiest of my children slurp this soup right up. Serve it with a bit of my No Knead Bread.

Chicken Stock
If you are using a left over roast chicken, pick the meat off and reserve. Otherwise, place a whole Organic or Free Range Chicken in a large stock pot.

1 large onions, quartered
2 cloves garlic, slightly crushed
2 carrots, quartered
2 celery stalks, cut in thirds
1 leek, cut in large chunks
1 lemon cut in half and given a bit of a squeeze
1 heaped tablespoon of Marigold buillon powder or Knorr stockpot tub
1 bayleaf
Any fresh herbs you might have: parsley, sage, thyme, rosemary, bay leaf
(Potato water if you made mash with your roast)

From a Roast Chicken: Pick the all visible meat off of the chicken carcass and put in the refrigerator for later. In the largest stock pot you have, put in the vegetables listed above, the ones from the bottom of the roasting pan, any fat and bones, burnt bits, etc. (Trust me, this makes the richest stock and will be strained later.) Cover the whole thing with water and cook covered at a low simmer for about an hour. (This could also be done in a large Crockpot.) 

From a Fresh Chicken: Add all of the ingredients and bring to a light simmer for 1 1/2 hours. If the temperature gets too high the chicken will get tough. After 1 1/2 hours pull at the drum stick. If it comes away easily,  remove the the whole chicken from the pot and set aside to cool. The chicken should be firm and the leg start to fall off. Reduce the stock further to intensify the flavor. You'll be able to make lots of additional dishes with the poached chicken.

Let the pot cool. Place a large bowl in the sink and line it with a large colander. Scoop all of the bones and vegetables into the colander and let it drain. Discard these items, they have done their job! Now pour the remaining items into the colander strain out the remaining bits and pieces. Finally, refrigerate this stock with some cling film over the top. Once it has really cooled down a layer of fat with float to the surface. Lay a paper towel on top and the fat will adhere to the towel. Throw it away. The stock can be frozen in portions for later use or saved for noodle soup. Tip: Pour some stock into those ice bags before putting it in the freezer. You can add them to sauces for quick flavour.

(For a more Asian flavour, add a knob of ginger, lemongrass and lime leaves.)


Noodle Soup
1 medium onion, diced
2 carrots, sliced
2 celery stalks, sliced
1 leek, sliced
1 T olive oil
2 liters/1 quart of chicken stock
1 1/2 cup diced cooked chicken
1 1/2 cups uncooked thick egg noodles (recipe follows)

In a medium sized pan, saute the vegetables in the olive oil. Add a portion of the chicken stock. Simmer the vegetables until they become soft. Turn up the heat to a light boil. Add the chicken and egg noodles. Cook until the noodles are tender, but not too soft. (If you don't have the time or inclination to make noodles, try cut up pasta, rice, wild rice or barley.) Adjust salt and pepper to taste. 


Egg Noodles
I use a classic pasta recipe for these. You can double the recipe if you want to make extra noodles for another day. When my grandmother made them, she would drape the noodles over a broom handle as they dried. I've cut mine a bit shorter to appeal to my children. 

100 grams (scant cup) 00 Pasta flour
1/2 tsp salt
1 medium egg
1 tsp olive oil
1 tsp water

Combine the ingredients into a food processor. 


1) In a food processor, add all of the ingredients and blend until the dough resembles a rough wet sand. If you pinch it, it should come together. (This can also be done by hand by making a well in the centre of the flour and incorporating all of the ingredients, but it won't have the look of sand.)


2) Bring the dough together into a ball and let rest with cling film for 5 minutes. 


3) Roll the dough out on a lightly floured board. I like my noodles a bit thicker, but the will swell when they are cooked. 


4) Cut the noodles vertically and then horizontally. 


5) Toss the noodles with a bit more flour to prevent them from sticking together as they dry.

Let me know how you like it. With the rest of the chicken, I made a Chicken, Leek and Mushroom pie, as well as some risotto. That has kept us for almost a week of meals. What would you make with the leftover broth and chicken?

Wednesday 16 January 2013

Slow Roast Lamb followed by Lentil Stew


Lamb and Lentil Stew
From days gone by, home cooks have made roast dinners which would materialise into a variety of dishes throughout the following week. My grandparents made a brilliant lentil soup that was usually on offer for the grandchildren around noon, as we could rarely make it to the usual 2:00 pm Sunday dinner hour. Dadou's recipe was very close to a Claudia Roden recipe found in her cookbook, A Book of Middle Eastern Food, and he used the left over bone from the previous lamb roast. That soup was a real favourite of my childhood. Now, as an adult with more sophisticated tastes, I have made a slightly more elaborate version. A vegetarian version could easily be adapted by eliminating the left over lamb and beef broth.

Fork Tender Slow Roast Lamb
15 minutes to prep, 3 1/2 - 4 hours to cook
Serves 4, plus leftovers for the stew 
(Doubles easily)

1/2 C white wine + 1/2 cup water
1 heaped Tbsp tomato puree (paste)
1 onion, sliced in wedges
2 lb/1 k boneless lamb shoulder (but any size is fine)
3 cloves garlic, left in their skins
3 sprigs of thyme
drizzle of aged balsamic vinegar over the lamb
Salt and Pepper 

To serve:
parsley
pomegranate seeds
1 to 1 1/2 cup course bulgar wheat and 1 tsp salt

Combine the white wine, water and tomato puree in the bottom of casserole dish. Add the onion wedges, thyme sprigs and unrolled the boneless leg of lamb into the dish. Nestle the garlic cloves around the lamb and liberally season with salt and pepper. Drizzle the top with aged balsamic vinegar. Cover the dish and put in a 150 C/300 F oven for 1 1/2 hours. Check the lamb at this point and add more water and wine if needed. It should be starting to get tender, but still firmly together. Reduce the oven to 100 C/200 F for an additional 2 - 2 1/2 hours. At this point you can keep it warm until you are ready to serve it. It will be ready when in gently falls apart when you prod it with a fork. 

About 30 minutes before serving make the bulgar wheat. Place 1 to 1 1/2 cups of coarse bulgar wheat into a large glass bowl. Using the same cup or mug, add twice the amount of boiling water to wheat in the bowl with 1 teaspoon of salt. Cover with a plate and set aside. After about 10 minutes, pull a fork through the bulgar to fluff it up. At this point you can check to see if it is ready. If it is still a bit crunchy add a bit more boiling water. If it is fully saturated, but there is too much water, drain the excess out. Check the seasoning.

To serve: Put the roast on a cutting board and remove all of the fat. Gently pull apart the lamb and put in a serving dish. Top the lamb with pomegranate seeds and chopped parsley and serve with bulgar wheat. Reserve all of the juice, onions and garlic in a large measuring cup for tomorrow's lentil soup. Cover with cling film and place in the refrigerator. A layer of fat will solidify on the top overnight. Also keep back a 1/2 cup of bulgar for the soup. (In a pinch you can add dried bulgar to the soup.)


Lentil and Lamb Stew

1 Tbsp olive oil
1/2 large onion, diced
2 carrots, diced
2 celery stocks, diced
1 cup green or brown lentils
shredded leftover lamb
Beef or Vegetable Knorr Stock Pot
2 - 3 cups water

Left over from the roast:
juices from the pan
whole garlic, squeezed out of their skin

Additions to serve:
handful of baby spinach
1/2 cup leftover bulgar wheat 
plain yogurt
harissa paste
fresh lemon juice

In a soup pot saute the onion, carrot and celery in 1 tablespoon of olive oil. Meanwhile, skim the fat off the leftover pan drippings from the roast and squeeze the garlic cloves from their skin. Once the vegetables start to soften, add the pan juices, Stock pot/cube, lentils and leftover shredded lamb. (If your lamb is very soft, you could wait until the end of cooking to add the meat.) Cook on a slow heat for about an hour, or until the lentils are soft. Before serving, add the cooked bulgar wheat, baby spinach and a squeeze of lemon to taste. Garnish each bowl with a spoon full of plain yogurt and a few dollops of harissa paste. (If you have access to fresh harissa paste, it makes all the difference.)

For my veggie and vegan friends, leave out the lamb (obviously) and use vegetable stock. To make the stew more complex, add finely chopped porcini mushrooms and a drizzle of balsamic vinegar.


Tuesday 15 January 2013

Claudia Roden wrote our family cookbook

Mediteranniean and Middle Eastern cooking is more popular now than ever. I was lucky enough to grow up in a family that knew about if first hand. We were eating yogurt, hummus and babaganoush back in the 1960s. My grandfather, Michael Abdou, came to America in 1925 from Palestine. Because men didn't learn to cook in that culture, my grandfather had to teach himself how to recreate the food of his youth. This food wasn't something he could easily pick up at his local market in Boston, Massachusetts when he first arrived (can you image life without the vast array of hummus now found in every supermarket?). 


Dadou and Mimi (Abdou)

Dadou, as we affectionately called him, discovered Claudia Roden's, A Book of Middle Eastern Food early on. First published in 1972, it became our family cookbook. I received my first copy in 1980, carefully covered with a milar cover, when I went off to university. Along with The Joy of Cooking, that book has been my trusty companion throughout my many homes and would be on my Desert Island cookbook shelf. 

One of the special things about living in London is that every now and then I catch an interview or television series with Claudia Roden. I always feel like I am visiting with family when I see her. Despite growing up Jewish in Egypt, her cooking is culturally the closest to the Palestinian cooking of my grandfather's youth (or is it that was his favourite cookbook!). For an more modern version of this delicious dinner, read my blog post Slow Roast Lamb followed by Lentil Stew. It is really yummy.

If you would like to learn more about Claudia Roden, you might enjoy this article from the Observer Food Magazine: http://www.guardian.co.uk/lifeandstyle/2012/mar/18/claudia-roden-spanish-food-interview#

Or see my Desert Island Book List: Desert Island Book List

What would be on your Desert Island Book List?

Sunday 13 January 2013

Turkish Towels


I bought and received a number of wonderful presents this Christmas. I purchase most of my gifts from www.Etsy.com this year. It was a wonderful way to find unique presents and not have to trawl the High Street looking in the same 10 stores found everywhere. Even better was the fact that the sellers on Etsy posted the items directly to their recipients. 

My favorite gift I purchased this year was a set of Turkish Towels from Orientina. I liked them so much I purchased them for my mother, in-laws and husband. I've included a link to Orientina's shop with their huge selection and a photo of my favourite towel.

Orientina shop on www.Etsy.com

The package was beautifully presented and came in good time. These towels wash beautifully and are wonderfully absorbant (line dry only, don't put it in the dryer). I think they will be great to take on holiday as a towel or beach sarong. If you order one, let them know you saw it on my blog.

Saturday 5 January 2013

Worthy Bran Muffins

Saturday morning: no bread, the bananas are brown and the milk is off. Don't panic, help is on the way. This is my go-to recipe.

My mother makes an art of reading the New York Times. With a pair of scissors in hand, she cuts out articles and recipes to try at a later date. She has discovered some real gems over the years. One such recipe was originally entitled Fruited Bran Muffins. I have made them for so long my recipe has evolved into something completely different over the years. Remarkably, my somewhat picky children even love them.


Worthy Bran Muffins

1 cup All-Bran Original cereal (buds not flakes)
1 cup milk
3 Tbsp vegetable oil
2 large eggs

2 mashed overripe bananas
1/2 cup raisins or chopped apricots
1 grated carrot

1 1/2 cups wholewheat flour (white all-purpose if you are feeling less worthy)
2 Tbsp sugar
1 Tbsp baking powder
1/4 tsp salt
1/4 cup sunflower/pumpkin seeds

Preheat oven to 400 F / 200 C (Fan 180C)

Stir milk with All-Bran cereal in a large bowl and let sit while you assemble the other ingredients. Add in oil, eggs, mashed bananas, grated carrots and raisins/apricots, giving everything a little toss with a fork. Add in the remaining ingredients and mix lightly with a fork until just combined.

Divide between 12 muffin cases (I like using silicone cases because the muffins slide right out). Top with more sunflower/pumpkin seeds.

Bake for 25-30 minutes. Let cool slightly before cracking them open and adding butter. Also great once cooled with a bit of cream cheese. These freeze well and are perfect for children's lunch boxes.

Variations: grate 1 zucchini/courgette, but squeeze out any extra liquid before adding it to the batter. Sour milk or 3/4 cup of plain yogurt can also be used as a substitute for milk.