Hammer

Thursday, 10 July 2014

Tactile Jewellery or Please Touch This

Twisted Ring collection by Michele Wyckoff Smith
In June, I participated in Hallmark Salon at Somerset House in London. This was the first time I exhibited in such a prestigious show, complete with glass cases and catalogue. I am more used to spreading my work out on a table top or shelf display. It made my jewellery a bit more "precious" than I am used to. I really enjoyed the event, but my work didn't get touched the way it usual does. You see, I always ask people to touch my work, because I think it adds another dimension to how people "see" it. 

Anticlastic cuff bracelet with texture


And then something amazing happened: after purchasing a group of my bangles, a new client asked if I would be willing to have her bring a friend back to feel my work. She explained that her friend had lost almost all of her sight and she brings her to the event to encounter the work through her finger tips. It was an extremely special experience for me. People have always said my work is very tactile, but now I was getting to show my work to someone who could only see it through their fingertips. She liked my work and has ordered one of my new twist rings, which thrills me to no end!

18 kt yellow gold pendants made from recycled rings

This chance meeting has really had me thinking about how my jewellery is much more than simple body ornamentation. Not only is it a ring, it is a touchstone; a pendant can be a talisman or a bangle can be a link to a long lost grandmother who left a bit of money to "buy yourself something special". Others might look at a piece and think it is special, but if you touch it and fiddle with it, it creates a whole different connection with the wearer.


Wednesday, 14 May 2014

Turkey and Chickpea Burgers

Yesterday, I made lots of new friends when I was "hanging out" on a Facebook Page. While we were waiting for something to happen, I mentioned I had just made our dinner - Turkey and Chickpea Burgers. It was something I could do in a moment and leave to cook on its own. After a number of requests for the recipe, I have quickly written it up here.


A few things to note: If you are gluten free, substitute a 1/3 cup of rolled oats and a bit more milk for the stale bread. If you are dairy free, you could substitute any liquid you fancy, perhaps even lime juice, beer or wine. These burgers are really a blank canvas that can be tailored to your families personal preferences. Try adding chive, cheese, middle eastern spices like cumin, tahini or dried fruit. Let your imagination take hold….


Turkey Chickpea burgers

1 400 gram can of chickpeas
1 lb / 500 grams of Ground Turkey Mince
1 small onion, diced
1-2 cloves of garlic
1 grated carrot
1 stale piece of hearty bread, torn into small pieces
2 eggs
2 T milk
squeeze of lemon juice to brighten the flavour
diced parsley
crushed red peppers
lots of salt and pepper to taste

Start by crushing your chickpeas with a potato masher or giving them a quick whirl in the food processor. Keep them chunky to add texture to the burger. In a separate bowl combine the onions, garlic, carrot, bread (rolled oats), eggs and milk, allowing the bread to absorb the milk and soften. This will be your binding agent. Mix together the chickpeas, softened bread, diced parsley, crushed red peppers and salt/pepper until it loosely comes together. 

With a 1/3 cup measuring cup, scoop up the burger mix and push it down with the the tines of a fork. Turn it our onto a foil or parchment line baking sheet. It will be a bit loose, but will come together as it bakes. If it seems too loose, add more bread/oats. Bake at 180 C/ 375 F for 20 minutes or until nicely browned and cooked through. Serve on a wholewheat roll with some salad and lots of nice condiments. Makes approximately 8 when using a 1/3 cup measure.

Special thanks to Libby Smith-Holmes who first made something like this when we visited her last summer.


Friday, 7 February 2014

Creative Process or how to get the juices flowing

Painter Chuck Close said, "The advice I like to give young artists, or really anybody who'll listen to me, is not to wait around for inspirations. Inspiration is for amateurs: the rest of us just show up and get to work. If you wait around for the clouds to part and a bolt of lightening to strike you in the brain, you are not going to make an awful lot of work. All the best ideas come out of the process; they come out of the work itself. Things occur to you."

Those words really ring true. It all comes down to don't judge, don't edit, just get in there and muck around. After you've played with some ideas, step back and see what you have created. 
"Ideas are like little furry creatures coming out of the undergrowth. You need to be nice to the first one." Grayson Perry, Reith Lectures, 2013
These are some of the creative processes I use to generate new ideas.

Sketchbook:

Sketchbooks are the place I capture ideas without judgement. Sometimes I make observational drawings at museums. I can't take the exhibition home with me in my pocket, but I sure can take little snippets of inspirations. Make sketches, texture analysis and notations of acquisition numbers of pieces in museum galleries. 

Sketches from the Asian Galleries at the V & A, London

Abstractions of shapes
I like a bold line. I'll take a photograph of something I find interesting and make a series of shapes without worrying if they "work" or not. I can then think about them as collage elements or 3D pieces in the next step of the process.
Idea generation for wax carving
Water colour is a great way to doodle. When I made this page in my sketchbook I remember thinking these are all things that I don't know how to make. I was really caught up in censoring what I drew because they were beyond my skill set. I then had an epiphany that there would come a day when I would know how to make these objects. It was a bit like creating a time capsule that I could visit later. Just looking at this page makes me want to carve some wax for silver casting.


Nail ring with labradorite
Chinese coin ring with jade and 18 kt fused gold


 This was a brainstorming session for a City & Guilds ring project. There were so many valuable ideas on these two pages that I made two rings for the brief. I also see seeds of ideas in work I am developing now. 


I love textures. These are some scraps of paper from some exercises I did on layering them. Many of these pieces were developed by making paste papers (a bookbinding process). I also used resist with watercolour and black ink stamped over the coloured paste papers.


Paper & Scissors:

Because my art is 3 dimensional and based on shape, I often work with paper and scissors. I cut a series of shapes, not worrying about what I am developing. Sometimes I will hit it right off the bat. Other times it will take almost a whole sheet to get some idea that I like. I take the shapes I like and push them further. 


I then think about how they can be manipulated, folded, turned in on itself or cut into. What happens if you change the scale? 

This red folded paper design was something I made years ago in a brainstorming session. 


Play with clay:

Another way to think dimensionally is with clay or Fimo. It can be quickly moulded and textured. Make it, photograph it, change it again, and take another photograph. What happens when you put things into it: cocktail sticks, paper clips, toys, etc.


Metal:

 After all of these exercises, start to translate it into metal. I think about changing the scale around depending on what it will become. Should I dome it to add more dimension? How do the pieces interact with each other when I move them around. Can they be layered?


Paper cutouts translated into metal
Same shape in two scales

Looking at the outline

Think about shapes as both dimensional items or simply as outlines.


Photograph:

With cameras on our phones, I find I can make lots of quick "notations" by snapping photographs of ideas. These quick snaps are useful when I am in the middle of a project and I want to think about how I can make variations on a theme. I will go back and refer to them later when I am looking for further inspiration.
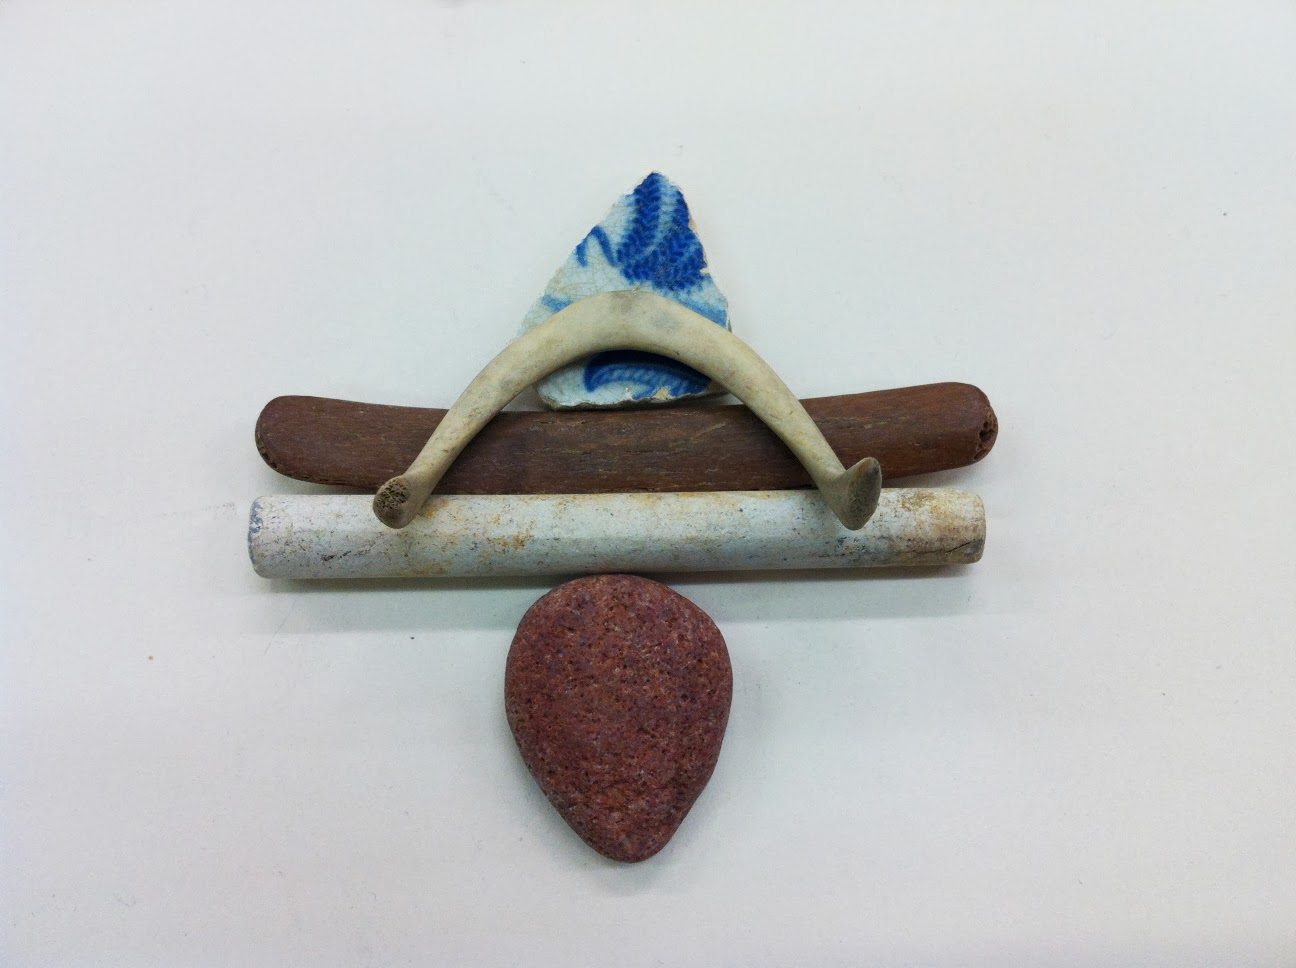

Inspiration for a brooch: collage of found objects
"Be playful and fun with the idea and it could lead to the next 10 years of work." Grayson Perry, Reith Lectures 2013
I would like to thank my former tutors at City Lit, London: Melissa Hunt, Masako Hamaguchi and Karola Torkos. We worked on many of these exercises as part of the City & Guild programme and I continue to use these practices today. 

Monday, 3 February 2014

Courgette, Leek and Feta Pie

There are times when I find inspiration from what needs to be used up most urgently in my refrigerator. This pie was born from just that experience one Saturday evening. 

The key to this pie is sautéing the courgette and leeks in advance of baking the pie. The other little trick is to add a tablespoon of risotto rice in the bottom of the pie to absorb the extra liquid produced by the juicy courgette. Once baked you don't even notice the texture of the rice.


Courgette, Leek and Feta Pie


2 thin young courgette (zucchini), sliced
1 leek, sliced
1 T olive oil
1 T butter
2 T chopped dill
1/2 cup feta cheese, crumbled
1 heaped T risotto rice
handful cherry tomatoes (optional)
5 eggs
2 T creme fraiche (in the US use sour cream)
salt
pepper
All butter puff pastry block (ready made is fine)

First a word about cleaning leeks. Slice the leek down the length and run tap water away from the root. This will allow any grit or dirt to run out of it. Slice into semi-circles.

Sautee the courgette and leek in a large pan until soft and slightly browned. 

Roll out the puff pastry into a large square and lay it over a ceramic pie plate. Let the pastry hang over the sides to flip over the top of the pie once assembled.

To assemble the pie, sprinkle the risotto rice on the bottom of the pie, cover with half of the dill and the cooled courgette and leek mixture. Add the crumbled feta, remaining dill and cherry tomatoes (optional). Season with salt and pepper to taste. Remember the feta has some salt in it, so adjust it accordingly. 

Beat the eggs and creme fraiche together. Pour all but 1 T of the egg mixture over the pie. Fold the sides up leaving a steam hole in the middle of the pie. Brush the reserved egg and cream fraiche over the pastry. This will give it a lovely browned finish once it has baked. 

Bake at 180 C or 375 F for 45 minutes. Check on the pie part way through, as you might need to protect it with a bit of foil to prevent it burning. To check to see if it is cooked, give the pie a little jiggle. If it feels firm, the egg will have set. If you see any liquid through the steam hole, bake it for another 5-10 minutes. 

Allow the pie to cool a bit before serving it with a green salad tossed with a light vinaigrette. The acidity of the salad is a nice balance to the sweetness of the courgette and leeks. It also can be served cold on buffet or at a picnic.

Let me know what you think! It goes quickly.


Thursday, 30 January 2014

Mourning Brooch


In June of 2013 I travelled to West Dean College to immerse myself in the world of Robert Ebendorf's brooch making class. It was such a pleasure to get to study with this incredibly generous and talented studio jewellery legend. 

Robert Ebendorf
West Dean College, Chicester (June 2013)
The day I arrived for the course, I received a call from my mother telling me her twin sister died after a short illness. The news filled my head and heart, making it difficult to focus on the task at hand.


Deborah Abdou Schram and Valerie Abdou Wyckoff
My cousin posted this beautiful photograph of my mother and her sister as teenagers, which I had never before.

Lots of things to choose from

Looking for inspiration
I laid out my inspiration on the bench, trying to decide how to bring the disparate pieces together into a cohesive and meaningful brooch. My mother and I have always believed that making art heals the heart, so I decided to make her a Mourning Brooch for her and her sister. 


Copper "road kill"
I started with the rectangular piece of copper that my mother gave me on her last visit. She found it in the road and saved if for me. (Lord knows that lady is going to get hit by a car picking up "road kill" one of these days!) It has a beautiful fold revealing the most perfect patina underneath. I added two mismatched, but similar oval earrings which represented the the separate, but similar eggs in the womb. I thought this was a fitting analogy of the personalities of the twins.

Work in progress on the back of the brooch
Popular in Victorian Times, Mourning Brooches often depicted an image of the deceased, a locket of their hair or their initials. These funerary items where worn during the morning period as a way to remember the dead and mark their passage. It was a way of keeping their beloved close to them after they died.

I wanted to make the back of the brooch as beautiful as the front. I really thought about how to sandwich the piece together, but incorporate imagery into the construction elements. The oval element echoes the concept of the womb where the twins developed together.


Mourning Brooch (front view): copper with gold plate oval earrings 


(Verso): Copper structure, b/w Xerox mounted on book board,
 enamelled element on sterling silver, steel brooch pin in brass holder
I was really pleased with how the piece turned out. It isn't really my usual style, but I learned a lot from it. Not only that, I was able to sit with my grief for a bit and think about my mother and her sister, who they were and what they meant to each other.